Past Work - Ghosts
This started out as a series of square cross-section glass columns each containing a hollow formed from an odd-shaped carrot. It's now evolved into a the plan to recreate each carrot as a hollow inside a solid glass specimen jar.
Until recently it went under the working title of "No One's Perfect."
I hope the specimen jars will:
- Look nice
- Make people smile
- Look like an x-ray of carrots growing in the ground
- Possibly make people think of their own bodies and the imperfections in them
- Question why people don't like eating odd-shaped fruit and veg
- Possibly make people think about attitudes towards human deformities and disabilities
The initial inspiration came from a "digital age" furniture designer, Gareth Neal, who exhibited at Plymouth College of Art in 2013.
I had a look at some of his stuff online and loved this table with what looked like lots of twisted roots underneath it:
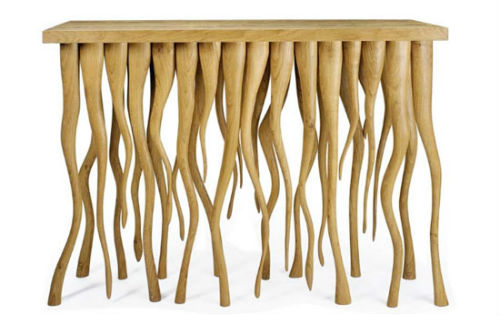
I don't know why, but I remembered the roots as deformed carrots and I've been toying with how to echo the idea in cast glass, with hollows where the roots are, ever since.
It got refined into a set of columns in a brain-storming session during a tea break at college, when I was casting around for a new project.
As it happens, I picked exactly the wrong time of year for carrots. Harvesting stops in March and starts again in May according to my gardening book, and shops don't stock deformed ones anyhow. I've advertised for them in "Freecycle" and someone is kindly promising to send me some this weekend. I've promised to send her one of my glass blocks as a thank you.
So, I'll start my usual photo journal:
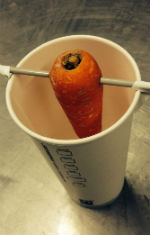 | I'm hoping that I can make a mould for each column (now specimen jar) by pouring molten wax around the deformed carrot. I'm hoping the heat from the wax will cook the carrot so that it's easy to remove afterwards. The photo is a test to see whether it will work. If the carrot doesn't come out easily I might par-boil it beforehand, or I might leave it in the garden so the carrot rots and woodlice eat it. Yum yum. This is not a deformed carrot, it's one I bought for 5p, and it's in a coffee cup given to me by the college canteen. I will make a square mould for the deformed carrots once I know how big they are. | |||
 | I've come up with a cunning plan!
| |||
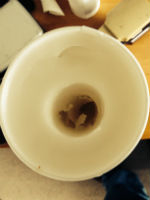 | Uh-oh. The result of my carrot in wax test is disappointing. The carrot came out quite easily but it hasn't created a corresponding hollow in the wax. It looks as though steam has escaped from the carrot as it was cooked by the hot wax and this has formed bubbles in it. So the simple idea of using the carrot to directly create a wax mould is a non starter. I think this is going to be a multi-stage process, details for discussion! | |||
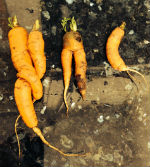 | My first mis-shapened carrots turned up today. Thank you Petrina! | |||
 | I came up with a way of making the wax positive without cooking the carrot, which led to steam creating bubbles in the wax in my first experiment. I'm cooling the carrot , dipping it into the molten wax, cooling it, dipping it and so on. It seems to be working. When I've got quite a bit of wax surrounding the carrot I'll cool them in the fridge and do the final wax pour into a clay mould, to get a rough cylinder shape. The photo is of the two big carrots - one wrapped around the other. | |||
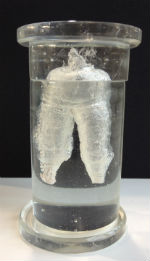
 | This is the medium-sized carrot, the one that looks like a pair of trousers. I've also dipped the small carrot, the one with curved spine and stubby legs. | |||
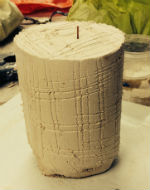
 | Here's the clay cylinder with the medium-sized carrot (shown above) inside it. I filled this with wax - pouring an inch, cooling, pouring an inch, cooling etc, up to the top. | |||
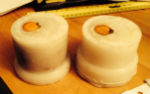
 | These are the wax cylinders for the medium and small carrots. I need to get some more wax to make the cylinder for the large couple. | |||
 | I've now used my lathe to turn the small carrot cylinder into a specimen jar and cut it in half. I've left a lump of wax on the base because I don't need to remove it - I will have to extend the wax mould with clay anyhow, to create space in the flint/plaster mould for stacking the glass. I just need to make sure that I use the right amount of glass, so it goes to the right level (or just above - because I can always grind stuff off). | |||
 | I picked the small carrot cylinder as a trial piece, and learned a few lessons:
| |||
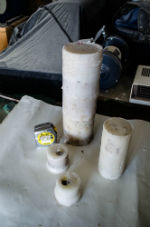 | I've now made all three wax cylinders, pictured. The carrot in the smallest cylinder (now in two halves) has already rotted and I've got most of it out. I've now put the two pieces under flower pots in a shady spot in the garden in the hopes that woodlice and other insects will eat the bits of rotten carrot I can't remove easily. | |||
 | I'm now going to focus on completing the specimen jar with the small carrot in it, using it as a prototype for the larger, more interesting deformed carrots. This photo shows preparations for adding a couple of millimetres of glass to each side of the joint so I can grind the surfaces flat without losing any of the carrot. |
 | Here's one of the moulds with the couple of millimetres of wax added.
Also, one of the slugs that ate the rotten carrot. It grew quite a lot
while it was working for me. I've been thinking that I might say the work was made by "Peter Heywood and slugs". What do you think? | |||
 | The hollow where the carrot was plus a truncated cone above it has to be
filled with soft flint/plaster - more flint than normal - so it would
crush more easily as the glass contracted as it cooled. I inserted a copper wire in each carrot hollow to reinforce it - copper because it has a similar coefficient of expansion as glass. | |||
 | Here's the wax moulds with the soft inclusions completed and the copper wires sticking out of the tops. I've put the wax elements on top of mounds of clay to create reservoirs where I can stack glass inside the mould. | |||
 | Next step - casting each of the above in a cylinder of medium hard flint and plaster. | |||
 | I added another layer of flint and plaster to the above cylinders, this time adding a couple of handfuls of glass fiber to the flint and plaster mix in an effort to prevent significant cracking of the mould. This layer covered the copper wires. The picture shows the moulds flipped over and the clay dug out to create the reservoir above the wax mould. I've now completed the next steps - steaming out the wax, measuring the volume of glass I need to reach the right level in the mould, and then leaving them to dry on the furnace. | |||
 | Forgot to take a photo of the moulds with glass stacked inside, in the kiln. The firing cycle was 85 hours - a long time to anneal the glass - but this is what the two moulds looked like when I took them out. There was 200ml of glass Bullseye glass in the cast of the bottom of the carrot and 170ml in the top. | |||
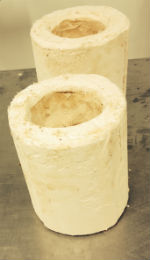
 | Here's what the glass looked like when I'd got rid of all the plaster and ground the two faces that butt up against each other. As college has now finished for summer I probably won't get around to doing further grinding until I go back in late September. | |||
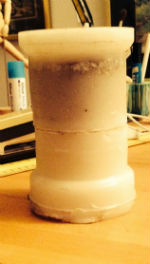
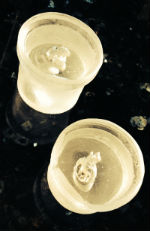
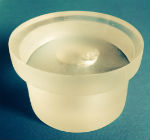
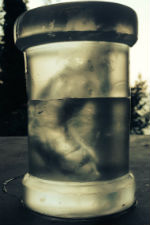 | I've been using a Xmas present, some diamond grinding pads (thank you Ali and Graeme), on the small carrot castings. I've got a lot of the surfaces down to 400 grit. The next step is polishing and I might have to wait to do this at college, where I can use cork belts. You can almost see the carrot in the specimen jar now. The photo reminds me of the scans of babies in the womb, which is kind of what I'm looking for - a medical connotation. | |||
 | I've
now turned the wax on the medium-sized carrot-in-a-cylinder on my lathe
to create another specimen jar and sliced it to make two moulds - see
photo. When I started the turning I managed to twst the top off the bottom, along one of the joints made while I was filling the cylinder. Fortunately, no harm was done. I glued the 2 bits back together again and was more careful when I continued turning - used a smaller gouge and a lighter touch. Worked fine! I've als
| |||
 | Turning the large wax cylinder, the one containing 2 carrots, on my lathe. When I was pouring the wax to make this big cylinder, I immersed a disc of wood in the top of the wax so I could screw on another piece of wood that would fit in the chuck. It worked well - no problems! The wax makes a right mess of everything - the lathe, my tools, the floor, my clothes etc. | |||
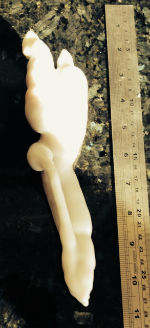
 | Here's the result of turning the big wax cylinder - the one containing the 2 carrots, one wrapped around the other. You can see the embedded disc of wood in the bottom of the shorter piece. I'm now adding a couple of millimeters of wax to the tops of these prior to putting them in the garden for the slugs to eat the rotting carrots. Getting the whole carrot out of this could be tricky; the one that winds around the other has some very narrow bits, followed by some fat bits lower down, and the carrots extend a long way into the wax - 19cm! The trickiness could continue - how will I know whether I've got all the carrot out, how will I know that I've got all the slugs and bugs out? The good news could be in the title - it would be nice for the end result to be perfect but if it isn't, it might add to the sculpture's message! This is going to end up being a BIG flint-and-plaster mould, a LOT of glass, and a LONG time annealing in a kiln. Luckily, the kilns don't get much use at the beginning of the academic year so I should be okay! | |||
 | I think (hope) that I (and the slugs) have got all the carrot out of my large (photo) and medium wax moulds now. They had about 6 weeks in the garden with regular scraping from me. Then I filled them with acid for a week. I've now neatened the tops and made a (feeble) attempt at getting the sides even smoother. I've also bought some copper wire to reinforce the inclusions and I'm attempting to coat them in plaster (like sparklers) so the metal won't touch the molten glass and leave a blue mark (as happened to a small degree with the small carrot). I've got about as far as I can until I return to college, unless I buy some fresh plaster. I'd quite like to be able to blow out any debris in the carrot holes with compressed air before doing the inclusions so I'm going to put this project to one side until the end of September. |
 | I must admit that the specimen jar for big carrot has ended up being much taller than I'd envisioned. This is partly because I went a bit crazy with the height of the clay mould for the cylinder, and then maximised the height when I turned it on the lathe. I think the carrots do go right to the bottom of the cylinder but the tops only go about an inch up into the upper part. Of course, the glass is only going to go just above the step so I'll be knocking off a couple of inches in the final piece. | |||
 | I've been having problems polishing the glass pieces for the small sculpture. It's bad enough that it's cylindrical but what makes things a lot harder is where it steps out at the top and bottom. Polishing the sloped surface of the step is almost impossible. Another problem is that I picked Bullseye glass for this project so that I could enter it into the competition run by Warm Glass. However, the choice has made things harder because Bulleye contains virtually no lead which makes polishing difficult. I've also discovered that it's possible to "acid polish" awkward shapes in glass but only glass with at least 24% lead in it. Won't work for Bullseye.......Dang! | |||
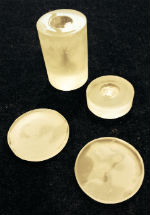
 | So .. I've decided to cast each piece in 2 bits - a cylinder and a disc, and then glue them together after I've polished them. I don't need to remove the step at the top of the wax moulds because there's plenty of room above the carrot. I can just keep the level of the glass low. However, I do need to remove the bottom step because the carrots extend a long way down the wax. The photo shows the medium bottom mould with the step removed. One bonus! This approach will enable me to shorten the big sculpture so it fits the carrot perfectly. | |||
 | The photo shows the second layer going on the plaster and flint mould for the bottom of the medium sized carrot. When I stacked the glass inside it I knocked off the tips of the carrots - will trickle cast the next one to try and avoid this. It's being fired now - forgot to take a photo! The real news, however, is that I've had a reprieve on the small carrot. My tutor thinks it looks nice with just the ends polished and the curved sides left as ground with 400 grit. I see what he means and it means I've sidestepped the polishing issues. As a result of this, I've reverted back to making the big carrot jar in 2 rather than 4 pieces. I hand made the moulds using Crystalcast and they're now drying on the furnace. | |||
 | Here's the 4 components for the medium sized carrot. Since making the decision to cast the large sized carrot in just 2 pieces, a well known French glass artist, Antoine Leperlier, has visited the college. He thinks I should polish all surfaces, contradicting the view of Glen Carter, our glass lecturer. | |||
 | This is the medium sized carrot after grinding with 80 grit. Antoine Leperlier thinks I should fuse the components together - not glue them. I'm investigating this! | |||
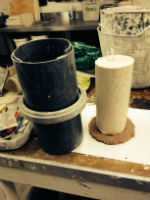
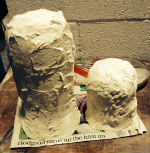 | Here's the hand-built moulds for the large carrot jar. I used Crystalcast and put three layers on the big one. I propped these up in flowerpots filled with casting sand. | |||
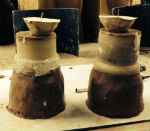
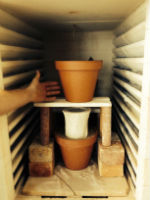 | Here's the moulds for the large carrot jar in the kiln just prior to firing. I'm trickling the glass into the moulds from the flower pots above them. Hope this will avoid damaging the carrots any further. They look fragile and disintegrated a bit when I was steaming out the wax. I don't think the plaster got into the bottom section of the carrot with a neck in it, but I don't think it matters - it still looks like a strange shape. There's 3.4 Kg of glass going in the bottom section and 1.5 Kg going in the top. The firing cycle is going to take 7 days. | |||
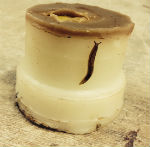
 | Phew! The firing of the large specimen jar went well. The glass is slightly yellower than in the other jars but I don't think that matters. Trickling the glass into the moulds resulted in quite a lot of bubbles in the cast, including some strings of tiny bubbles that loop about, almost like traces of flies. I like them - I think they add interest. This is two carrots, one wrapped around the other because they were planted too close. I've lost the lower half of the wrapped-around carrot, which I'm not really surprised about. I don't think it matters. The twin carrot arrangement means there's crevices where it's difficult to remove the plaster. I'll try soaking them in patio cleaner acid. | |||
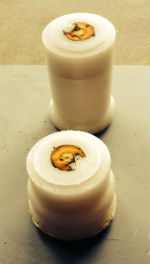
 | I've spent a lot of time grinding and polishing and this is the result - an almost completed specimen jar containing the ghost of the medium sized carrot. At present this is in four pieces - a disc at either end and two cylinders in between. I've been researching ways of bonding them together, which isn't as easy as it sounds. | |||
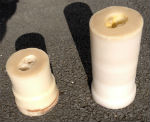
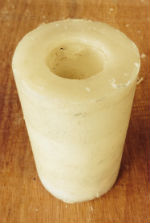
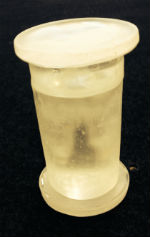
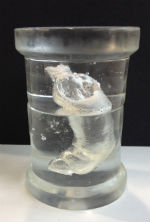 | This is the specimen jar containing the ghost of the small carrot. I still have a bit more polishing to do on this one, which is in two pieces. | |||
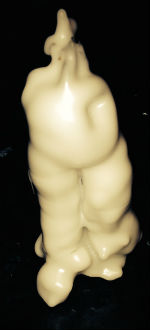
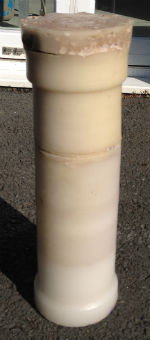
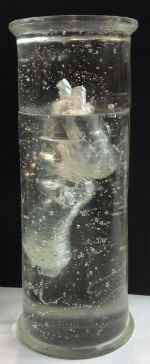 | I've now almost finished polishing the big carrot, pictured. I've decided to rename this project "Ghosts" and I've written a little artist's statement to go with it: These are the ghosts of carrots that are no more. Only the space they once occupied remains, preserved in specimen jars for future study. |
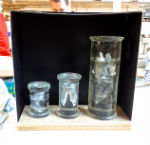 | I've been experimenting with different ways of presenting my jars. Originally, I'd thought of them on a shelf. Then I decided the carrots would show up better against a black background, so I started thinking of making a box using black glass or vitrolite - see mockup in the photo | |||
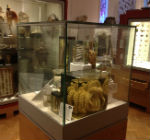 | After a discussion with Glen Carter, our glass lecturer, I decided I ought to reinforce the visual signals that the specimen jars contained oddities worthy of study by making them look as though they were in a museum. I visited Plymouth's City Museum and found a display case with specimen jars within it - see photo. I then researched ways for obtaining a display case, either by making one myself or buying one ready-made, either new or second-hand. They turned to be difficult to make well, and expensive to buy. | |||
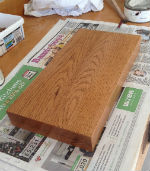 | Luckily, sense prevailed. The College glass technicians questioned why I wanted to obscure the view of the specimen jars that I'd spent so long polishing and suggested putting them on a plinth, which feels like the right solution - no obstructions and you can then walk around the specimen jars, seeing them from all angles. I bought a scrap piece of oak for £2.50, sanded it off (it was trickier then you'd think to keep the edges flat) and polished it - see photo. I plan to attach a brass plate inscribed with "Ghosts of deformed carrots" in Latin. Making sure the Latin is correct is proving the next challenge! | |||
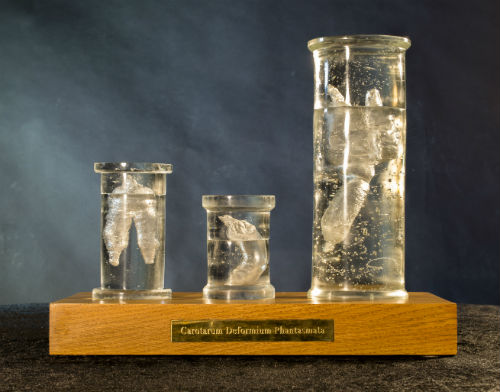
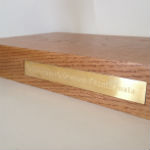 | I've now incorporated a brass plaque in the plinth. The plaque was engraved by Luke Axworthy, a fellow student, and the Latin translation of "Ghosts of Deformed Carrots" - "Carotarum Deformium Phantasmata" - was kindly provided by Richard Urquhart, a Classics teacher at Oakham School. I might rub a bit of grime into the engraving to make it stand out more. Then I need to get the whole installation photographed properly! | |||
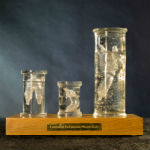 | My best effort at photographing the completed project myself. I haven't stuck the different parts of the specimen jars together, partly because it's much trickier than you'd think. For instance, how do you get the bonding material to cover the whole surface of the joint, so it doesn't look like blobs of glue, without it trickling down inside the hollow carrots and spoiling their surface detail? Beats me! | |||
| I've written an evaluation of this project in my blog. Click on this link to see what I think about it. | ||||
| A photographer, Tim Smyth, has created a whole book of pictures of "defective carrots". Check out this article on "It's Nice That". I sent him a photo of my "Ghosts"....he replied but didn't seem to "get it". | ||||