Past Work - Faces
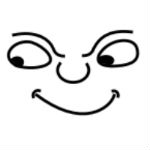
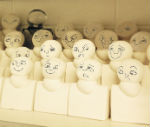
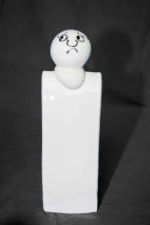
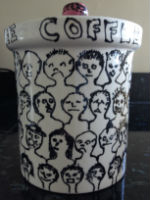 | The idea started with this jar, which I painted last year. I like the way my scribbles capture different emotions/attitudes. I want to see whether I can do a similar thing in 3D, by slip-casting a standard bust in clay and then modifying it while it 's still soft - reshaping it, cutting bits out, adding bits. | |||
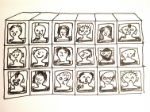 | The assignment calls for being creative about the way I present my work, so I'm thinking of slip-casting a lot of open hollow cubes with busts of people inside them, stacked in a wall. Its large scale should be impressive but it will be easy to transport and quick to build. I see this as a development of previous themes: human heads inside boxes (see "Wise" Paperweights), making large scale installations from segments (see Column) and slip-casting (see Ring) | |||
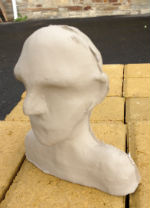
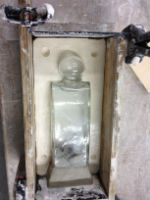
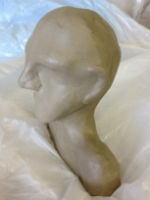 | Solid clay bust for making a plaster mould for slip-casting. This probably won't be the bust I use for the final project. It's so I can experiment with modifying slip cast figures. | |||
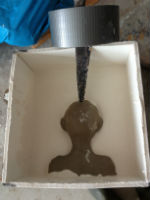 | Half way through making the plaster mould. I had to stick a knife in his head (ouch!) to stop him sinking while the plaster went off. | |||
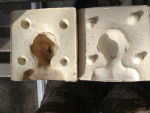 | Completed mould for experimenting with slip-casting heads and modifying them afterwards. I've tried one slip-cast, which failed. Opening the mould ripped the head in half. The clay was too thin and not dry enough. I've washed the mould and I'm leaving it to dry thoroughly before resuming experiments. | |||
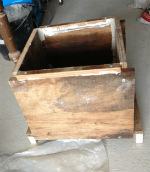
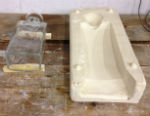
 | The wooden positive to create the plaster mould for slip-casting the boxes. The side length is about 18.5 cm. It will shrink to around 17cm, so a stack of 15 in 3 rows would measure 85-cm wide by 51-cm high. I've tried to make it so that it can be dismantled from inside the mould - which is really tricky to achieve. | |||
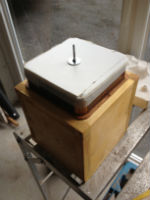
 | The above positive fits inside this box, bolted down so it won't float. I've allowed for 5-cm thick plaster all round. | |||
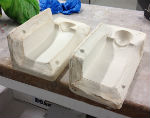
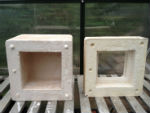 | Completed mould for slip-casting cubes. I managed to dismantle the
wooden positive inside it! The inside surfaces aren't as smooth as I was
hoping for but I think I can deal with that by smoothing the clay after
slip-casting. I was planning on using a white glaze on stoneware for the cubes but I'm now toying with the idea of slip-casting them in terracotta (ie no glaze). | |||
 | First slip-cast head. Timing was 19 Sept. 16:15 poured in slip. 17.55 tipped it out and left the mould to drain over night 20 Sept. 11:00 turned the mould upright. 20:00 unclamped mould and then decided to leave it 21 Sept. 11:30 opened the mould and the casting seems good. Now modifying it. | |||
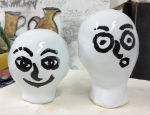
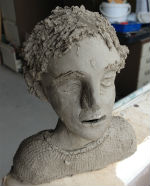 | Work in progress on modifying the first slip cast head. Questions: 1. Will my additions fall off as it dries and is then fired? 2. Should I keep things a lot simpler, bearing in mind that I'm going to make at least 15 and I want them to have a consistent style? 3. Should I try and make them like members of my family? Am I good enough to capture recognisable features? |
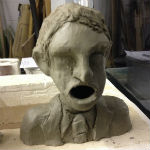 | Second slip-cast head. This time I experimenting with opening up the mouth a lot, padding up the jowls and pushing the nose in a bit. It reminded me of a bombastic school teacher so I gave him a shirt, tie and jacket. | |||
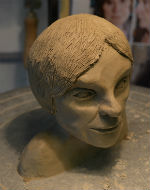 | I tried modifying a third slip cast head to make it look like Beryl, my wife. I couldn't make it work, so I scrapped it and made a solid clay version instead, with a view to making multiple copies, possibly with different facial expressions. I had to make the hair look like a helmet because I'm using it to make a plaster mould. I'll aim on improving the hair after slip-casting. At the same time, I'll try and make heads look more like Beryl! | |||
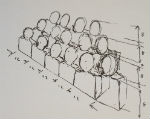
 | A BIG shakeup following a really productive tutorial with Chris Taylor, ceramics lecturer. Chris suggested that I focus on the key message, how facial expressions convey all sorts of emotions, and eliminate other distractions, such as remoulding the heads after slip-casting. He suggested going the other way - making the heads have an absolutely identical shape, as though they're made by a machine. In that way, the only thing that'll change is the expressions I paint on. I've also decided to scrap the boxes, another distraction, and instead mount the heads on a raked stand so they look like spectators in a stadium. | |||
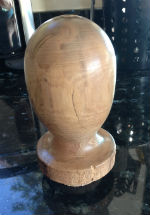 | I've now made a head by turning a piece of walnut on my lathe. I've smoothed and waxed it so that it looks machine-made. Next step is to make the top half of the body and join the head to it. When I've got the whole thing really smooth I'll use it to create a mould for slip-casting multiple busts. | |||
 | More changes! I've dumped the idea of making a wooden positive. Instead I will make the first figure in hot glass and then use it in 2 ways - as a positive for making moulds for slip-casting and as part of the final installation. The glass "see through" figure among ceramic figures will indicate that facial expressions sometimes mask the emotions going on inside someone's head - at least, that's the idea! | |||
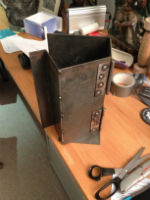 | This is the mould for making the body of the glass figure. I made this with the help of Noah, the lecturer in large metal, at Flameworks, the workshop used by Plymouth College of Art. It's made from 3-mm-thick steel sheet and some cheap hinges. The folds are made by scoring the sheet with an angle grinder and then bending it over a straight edge. The whole lot is tacked together with little bits of MIG weldiing. | |||
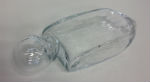 | I ended up modifying the mould a little so that the shoulders wouldn't be too thick. I used it to make the first glass figure, pictured, with a lot of help. Lawrence West, the hot glass technician, blew the big bubble into the mould and Helen added the neck. I blew the head and added it to the neck. We've now repeated the exercise, making a second figure with a longer body. | |||
 | I'm half way through making a mould from the larger of the two glass figures that I've made with Lawrence West's help. I'll use this mould to slip-cast lots of ceramic clones. I'll cut some of them down and make further moulds, and further slip-cast clones, so I have a banked arrangement of figures, most of them ceramic. | |||
 | It was a bit of a struggle getting the glass out of the plaster mould - the ripply marks on the side of the glass figure probably equated to undercuts. I'm glad I sprayed the glass with a special wax release agent beforehand. The surface of the mould is beautifully smooth but getting the glass out led to a small amount of damage - half a dozen fairly shallow flakes of plaster. | |||
 | Second mould. This time I made the mould so the joint was at the corner (each part of the mould was for 2 sides) which made it much easier release. I sheared off a couple of the locating knobs but I think it'll be okay. | |||
 | I've tried out painting faces on glazed test pieces, using K10 black enamel powder mixed with fat oil. Not too happy with the results. | |||
 | I've decided to draw the faces on my computer using a drawing package called Eazydraw. They look pretty good! I've now drawn 24 and sent them off to Fotoceramics to get transfers/decals made. |
 | I've made some casting slip from four 12.5 Kg bags of white earthenware clay, 8 pints of water, 64 gms of sodium silicate and 21 gms of soda ash, mixed up in a dustbin on a little trolley I've made. And now I've done my first cast - filling my first mould with slip and emptying it after an hour. So far so good - need to figure out how long I need to leave it before taking it out of the mould. | |||
 | So far I've slip cast three figures and had two successes. The third one stuck to the mould in a couple of places, which ripped holes in the clay wall. It was a new mould and, apparently, problems with the first cast sometimes disappear on subsequent casts. I'm now leaving the slip in the mould for an hour and then waiting four hours before taking the cast out of the mould. By that reckoning I could make six a day from my three moulds! | |||
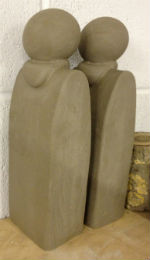
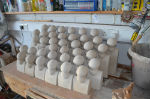
 | Slip-cast figures just out of moulds, drying to leather hard before "fettling" - making the joints disappear by scraping off excess clay and smoothing the result with a wet sponge. I fettled earlier figures before letting the clay go leather hard which, I learned, was one of the reasons I could see joints after they'd dried. It's not a problem because I can go back and fettle dried out figures. | |||
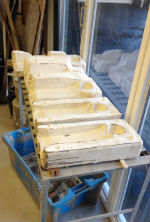 | I've now slip cast a total of 38 figures, 3 of which I've had to scrap for various reasons:
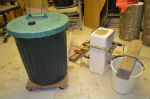
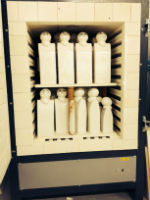
As a result I "learned" to be more careful clamping the moulds together, leave the slip in the mould for about an hour and leave the clay in the mould for another 3 hours before taking it out. Recently, I've learned another lesson. I haven't left much time between undoing the mould, putting it back together again and pouring in more slip. As a result, the moulds have got steadily damper so I'm having to leave the clay in to dry for a lot longer - over night now. So I've decided to call a halt on casting for a couple of days and dry the moulds out (pictured) before continuing. It's Christmas eve so duty calls elsewhere anyhow! | |||
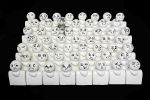
 | Here's how things are looking so far. There's 38 figures in this group, but slip-casting has come to a grinding halt. The moulds were getting too water-logged. I had a couple of failed castings (6 figures in total) and the latest cast - poured on 27th December - still hasn't dried sufficiently for me to strip the mould. I'm leaving it until 5th January and then opening the moulds regardless, so I can dry them out properly. So near but so far - I only need 6 more figures and there's 3 in the moulds, but everything is on hold right now! | |||
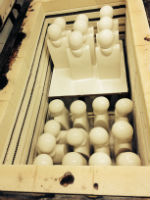
 | I've now bisque fired 36 figures - the photo shows them in the kiln, after firing. I managed to break one while packing them in boxes to take them into college, and then break another unpacking them. I've washed them and experimented with 2 types of white glaze on some samples. I've also had a good discussion with Glen and Min, the 2 glass lecturers, about them - conclusion being that I should make the face drawings grey rather than black, and play around with the whole arrangement to see whether I should add another row or two of taller figures. | |||
 | I've now glazed four figures - the shorter ones by dipping them into a bucket of glaze and the taller ones by pouring glaze over them. Dipping seems to produce a more reliable result so I've now made a tall tubular vessel so I can dip all the figures, regardless of their height (assuming none or more than 450-cm-high!). The glossy white glaze is G14 with 10% of zirconium silicate. | |||
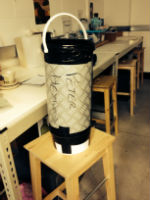 | I've now used my tubular vessel, pictured, to glaze the remaining 32 figures. I could only fit 31 in the kiln so one will be fired separately. To make the vessel, I cut the top off a plastic tub and use both bits at either end of a roll of lino, effectively making the tub half a metre high. I put a bin liner bag inside but I won't bother next time - it got in the way and sprung a leak because of my vigorous stirring. The vessel itself didn't leak (although I prepared for that eventuality by putting it inside my big tub). | |||
 | Glazing successful, apart from one whose head must have touched some insulation hanging down from the lid. I've also restarted slip casting, to make the 11 I'm missing. Six made so far. | |||
 | I've been experimenting with different ways of putting faces on the figures. In this photo I've tried using a transfer made by Fotoceramic on my one dud figure - the one where the head touched the insulation when the glaze was fired. I had to cut the transfer to make it lay down on the spherical surface. I've also learned how to do screen printing so I can make transfers myself. I plan to experiment with free-hand drawn faces as well. | |||
 | That worked out pretty well. I've now ordered some grey enamel "onglaze" to try screen printing stuff myself. | |||
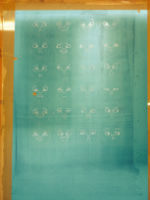
 | I've made this mockup on Photoshop to try and make a decision on whether to go with freehand or computer-aided drawn faces. |
 | Here's the screen I made for my trials of printing transfers of my computer-drawn faces. I printed things okay with ink but made a total mess of printing with the grey enamel - pressed too hard with the squeegee. Then events overtook me - I decided to draw the faces freehand and I started to run out of time. Bottom line - useful experience for a future project. | |||
 | After quite a bit of experimentation and asking opinions I plumped for
creating the faces freehand. More experimentation followed with
various ways of doing this - caligraphy brushes, "onglaze" pens,
homemade bamboo quills. I ended up reverting to using paint-a-pot style
glaze in a bottle with a nib. I painted all 56 figures in a couple of
hours and they are now in the kiln, being fired at 998 degrees for 25
minutes (as per a previous experiment). | |||
 | The glazing went okay. I ended up with a few duds - the white glaze peeling off in places - but I still had enough to put together 7 rows with 8 in the first row, 7 in the next, 8 in the next etc. I had to use one dud in the front row. It's not too bad but I might make one extra one so everything is perfect. | |||
 | I have mixed feelings about my painted faces - whether it was right to paint them freehand, whether I should have taken more time over them, whether etc etc. I think some of this is just how one feels at the end of a project. | |||
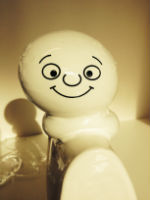
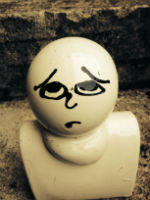
 | I got Dan King, a photography student at Plymouth College of Art to take these photos, which form the basis of my entry into the "Inspired by" competition staged by the Victoria and Albert Museum. The deadline was last Friday, 21st March. Fingers crossed! I've now had a "we regret" email saying my project hadn't been selected and I've had a few days to get over the disappointment. I'll try submitting it for other competitions, and I'll make something else for the V&A next year. The face, left, seems apt! | |||
 | Mim Brigham, a fellow student at Plymouth College of Art, suggested I scatter my faces around the garden. Good idea! I think the faces look good when they're viewed individually. | |||