Past Work - Ring
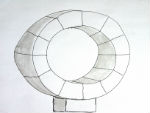 | This is another example of me using segments to make larger scale sculptures (see "Column" and "Light Waves" for other examples). In this case, I'm trying to make a large (90-cm-diameter) hollow ring by slip-casting 12 segments. Note the "trying". I've been trying off and on since January 2011 and things haven't gone smoothly. The clay collapsed inside the mould in a lot of cases but I've now solved the problem thanks to advice and chemicals from Maria Psiliagkou, a ceramics technician at Plymouth College of Art. | |||
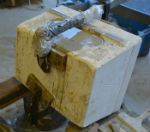
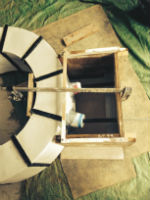
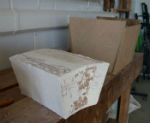 | First stage was to make a wooden version of the segment (foreground) and
a box to contain it (background) to pour a plaster mould. | |||
 | I made the plaster mould in 2 steps to create a box and lid. I drilled two 75-mm holes in the side to pour the slip in and out. Later on, I joined the holes up to make a bigger hole for the slip to escape. I scratched a date on the side when this was complete - 11th January 2011. In other words, this project has had many inactive periods! | |||
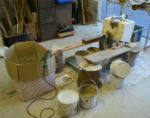 | Here's my set-up for pouring slip. Polythene on floor. Mould clamped
together on planks beneath which is a tray and empty pots to catch slip
when it's poured out. Slip is mixed with electric drill in the cardboard box on the left (to stop spray). | |||
 | The mould is filled with slip and left for a couple of hours. Early on I
tried leaving it for a lot longer - overnight in one case - to try and
cure problems. After a couple of hours, I turn over the mould and let the slip spew out over the pots and tray beneath it. I roll the mould back so the hole is uppermost after several hours. After a couple of days I remove the clay around the opening, put some props inside and leave it dry for about a week before removing the segment from the mould. | |||
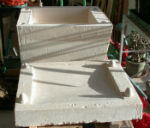
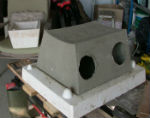 | This is one of the more successful early segments. A lot of them were
failures. The clay peeled away from the walls and collapsed inside the
mould. After a disaster I'd be so fed up I'd move on to other projects, sometimes for several months at a time. | |||
 | An early completed segment. I've now joined the holes up in the mould to make it easier to remove the slip and I've made the slip a lot less viscous by adding water and chemicals (sodium silicate and soda ash). As a result, the last 8 castings have been successful. The walls of the segments are much thinner - hope they're not too thin! | |||
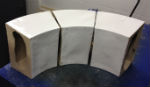
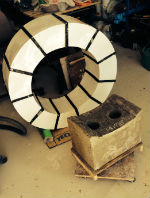
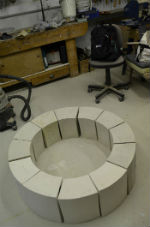 | I've now made 13 segments - one extra to allow for breakages and possible replacement of an early one that I had to "repair". I've checked out what the ring will look like - see photo. All the segments have now been biscuit fired (by Jenni Phillips). I'm now waiting for the spray booth at college to be working so I can glaze them. | |||
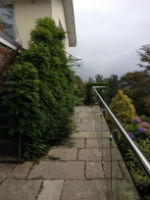 | I've added this photo after discussing the ring's location with Chris Taylor, ceramics lecturer at Plymouth College of Art. Chris demonstrated the importance of considering the context in a tutorial with me - which I've written up in this blog entry. The ring will go right at the end of this elevated walkway, where it stops above our neighbour's fence. You walk along this walkway to get to our front door, where the glass canopy is. | |||
 | I've now glazed all 13 segments. Three came out of the kiln today (11th Dec). The glaze is mildly disappointing. It was advertised as "glossy white large crackle" but it's come out simply white - no crackle in sight. Also, there's a few small bald patches but they're good enough for the garden. The other 10 are being fired - will be out on Friday. My plan is to erect the ring over Xmas - 3 years since I started this project! | |||
 | I decided to scrap 2 of the segments that cracked badly during firing of the glaze, which meant that I couldn't assemble the ring over Xmas as planned. (In any case, I was busy slip-casting dozens of figures for my Faces project.) In the past couple of months I've made and glazed another segment and today I've started to assemble the whole thing on the workshop floor (picture) and stick them together with mastic/glue. | |||
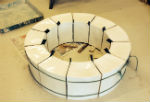
 | I ended up placing the segments on top of an extended door so that I could swing it upright without putting a lot of strain on the half-finished joints. I stuck a piece of rubber carpet underlay between each segment to try and avoid points of high pressure. I've now filled all of the joints with a thixotropic polyester resin paste mixed with black dye. In this photo, I'm making clay mould above each joint to create neater looking joints, using some more polyester paste. I'm making them a constant width using a piece of metal band that's pinned to the centre of the ring. It's also enabling me to mask the fact that the segments don't butt up perfectly. One other discovery - I've managed to lose a segment! There's only 11, and I wouldn't have been able to fit a 12th one in! I think the end result will look like a clock so I'm now thinking of calling it something like "The Eleventh Hour" or "Not Enough Time." |
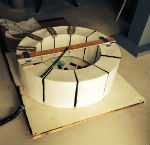
 | | I've now completed all the joints although I still need to tidy them up. I've moved the ring into an upright position. | ||
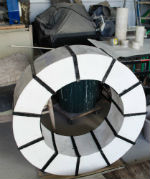
 | I'm now making the concrete plinth. It's taken a bit of thought because the ring needs to withstand strong winds and yet I don't want to have fixings visible. My solution: I'm casting the plinth up against the ring and then separating it after it's cured. The pipes and yoghurt pots spanning the box will form holes through which I can thread bolts into anchors in the suspended concrete walkway beneath it. Once I've got the plinth in place I'll "glue" the ring onto the plinth using the polyester paste I used to join the segments together. | |||
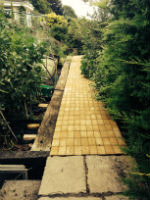 | The ring is going at the end of this suspended walkway, which ends above our neighbour's fence. It will act as a boundary marker and as a sort of target at the end of the long, straight walkway that goes past our front door. I've laid block paving on top of this section of the concrete walkway, partly to make it look nicer and partly to accentuate the perspective and lead people's eyes to the ring. | |||
 | The plinth casting has turned out well. I've covered it with a damp cloth and I'm going to let it cure like that for a week before bolting it on to the walkway. | |||
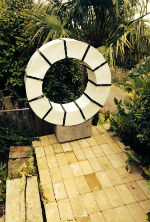 | Completed...apart from a tiny bit of tinkering with the 3 paving blocks on the left of the ring to bring them into line with the other 497. I rolled the ring from the workshop to the other end of the walkway, using 2 very old sleeping bags to cushion it. I slid an upright plank between the fence and walkway and then bound the ring to it once I'd lifted it onto the plinth. I raised the ring a couple of inches above the plinth using stacks of blocks on each side, so I could cover the plinth in a layer of polyester paste. I then lowered the ring onto the plinth and trimmed off the excess paste around the joint. | |||
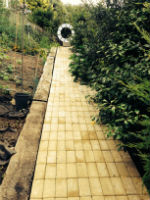 | I glued the right hand paving blocks to the southerly edge of the walkway using polyester paste. I then used this as the basis for laying all 500 blocks, so that they were very straight. I wanted the lines to accentuate the perspective and lead the eye to the ring, which I think works really well. | |||
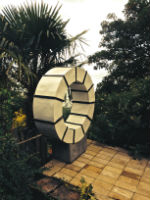 | I'm really pleased with the outcome. I think the setting is just right. There are a lot of imperfections in the ring - one less segment than planned, glaze didn't crackle as planned, segments distorted, one segment cracked, joints a bit rough, etc etc - but I don't think it matters. It's strange in a way that this had so many problems and turned out really well - almost the reverse of my Faces project, where I didn't have a lot of problems but the end result is a bit disappointing. I think this project has taught me to have the courage of my convictions. I persevered when things went wrong and in the end, it's paid off. | |||